REPAIRS
Check out our top repair tips from our product designer, Iris Slappendel on easy at home repairs to reclaim your broken cycling garments. The blog covers removing surface dirt and mud, blood stains, oil stains, repairing seams, fixing zips and patching holes!
Stains
Surface dirt and mud
- Wait for the mud to dry
- Brush it off – do this outside, or over a sink, so you don’t spread the mud all round your house! Or jump in the shower/bath and brush it off there so you can wash it down the drain before getting a warm shower as quickly as possible!
- Wash it at 30 degrees without softener
Blood Stains
- Patch yourself up first!
- The quicker you are able to deal with the blood stain, the better. Fresh blood is fairly easy to remove.
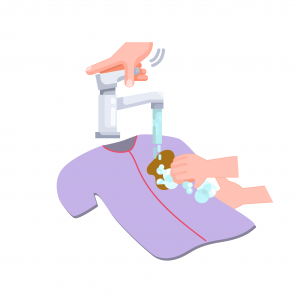
- Soak the garment under a cold running tap and massage the stain very gently with your fingers or a sponge. Leave to soak for an hour in cool water. Soaking blood stained fabric in cool water can help break up the stain and make it easier to remove.
- If the stain is still visible, wash it on a cool cycle with an enzyme cleaner in the wash cycle. Enzyme cleaners are exceptional at removing protein-based stains. Do not tumble dry! If a blood stain still remains after washing, heat can set the stain because it’s a protein based fluid.
- Let the item hang dry. When an item is wet, it will fool you into looking as if the stain has completely disappeared.
- You might have to wash it in the machine several times before the stain is removed to your satisfaction.
Oil Stains
- Pat those pesky oil stains with some kitchen towel to absorb any excess liquid.
- Oils can be water-repelling, so pre-treat the stain with washing detergent liquid. Rub a little detergent into the stain (or work it in with a soft, old toothbrush very gently so as not to damage the fabrics), and leave for a few minutes to an hour.
- Flush with cool water, then wash as usual at 30 degrees.
- Another option is to sprinkle baking soda onto the stain which will draw grease and oil out of the material without damaging the fibres.
- Leave the powder overnight. Brush it off the next morning and it should have absorbed most of the bicycle grease.

Seams
All our seams are carefully hand-stitched, but as these are the ‘joints’ of your garments, they are also the weakest point and our most commonly requested repair, but it is also simple to fix with the easy steps!
- Grab a sharp needle and thread of a matching colour or another fun bold colour for contrast!
- Turn your garment inside out and tidy up any loose threads on the inside
- Pin the ripped seam
- Tie a knot in the end of your thread and insert your needle into the fabric about 2 cm before the beginning of the ripped seam.
- Close the seam. Use a straight stitch or to begin by sewing another seam. At first, you’ll be sewing over some existing stitches. This will help secure the new seam as well as the old seam that’s on either side.
- Make small stitches going in and out of both layers of fabric all along the ripped seam, following along where the stitches used to be.
- Once you’re done, go over the final stitches a few times and cut your thread.
- Turn your garment inside out and take a look at where the ripped seam was. If you see any spots where you’ve missed sewing or a place where it doesn’t look secure, turn the garment inside out again and make some additional backstitches until you’re happy with the result.
- Very quick and simple, but this will keep your garment in use for years to come.
- If you’re unsure on how to do this at home, you can ask a local seamstress or send a repair request to IRIS and we will help you out.

Zips
Find out how to tackle the most common zipper problems simply with some tweezers or pliers and a steady hand. Zips can separate, sliding open when not wanted, or get jammed, and no one wants to throw away a perfectly good garment because of a faulty zip that could be repaired.
Did you know it’s easier to repair a zip than to replace it with a new one? This is because you have to unstitch the entire zip, replace it and restitch the new one in.
Jammed Zips
- Check that the surrounding fabric isn’t caught in the teeth. Assess for any snags, folds or tangles that may have got caught.
- If you find that the surrounding fabric is caught, gently pull it away from the zip, either by hand or with tweezers, to ensure you do not tear the fabric.
- Take a graphite pencil and rub both sides of the teeth, focusing on the middle where the teeth intersect. This will coat the teeth with a light coating of graphite – this will act as a lubricant to help facilitate a smooth run. If the zip glides smoothly, wipe off the remaining graphite.
- If the zip continues to stick, use a product with more lubrication. Common household items such as soap, window cleaner, or lip balm and vaseline will do the trick.
- Add the product directly to the teeth. Gradually pull down the zip, applying more product as you go, and continue to do so until the zip comes all the way down.
- Keep the product on the zip, avoiding the surrounding fabric to prevent discolouration and staining.
Slippery Zip
- If the zip keeps sliding down then the zip might have been stretched or the slider has come loose.
- Check the slider and gently squeeze the plates together with a pair of tweezers to compress and tighten the slider.
- Try coating the top teeth with hairspray to add resistance or using clear nail polish.
- Nail Polish: While the zipper is open, paint both sides of the zipper teeth with nail polish and allow to dry completely. You may need to use several coats of clear nail polish, depending on how loose the zipper teeth are.
- Hairspray: The hairspray acts as glue, holding the zipper teeth together. This process needs to be repeated each time you open the zipper, or wash the item.
- If that doesn’t work, please request a zip replacement repair request.
Zip teeth aren’t aligning
- First, check whether any fabric is caught in the zip. If so, remove fabric carefully with tweezers.
- If not, take a look at the individual teeth. If any of the teeth are sticking out, move them back into place with a pair of pliers.
- If the teeth are straight, there might be an issue with the slider mechanic. Over time the slider can start to come apart and lose grip of the teeth of the zip. With a pair of pliers, apply some gentle pressure to close the slider.
- You can also check the type of slider (there is usually code under the brand name so you can easily order an exact replacement, or find one on ebay!) We use YKK Zippers.
Tears and Holes
Small holes can happen, the most common are shredding some singletrack and catching your garment on a thorny bush, or perhaps you accidentally sat on a rough wooden bench or gritty concrete for that much deserved rest?
Don’t let a small hole become a big hole. Repair is as soon as possible with our two options below:
- Stitch up the small hole by hand
- Patch the hole with a homemade repair patch, iron-on patch or some tenacious tape.
Stitch up the small hole by hand
- Take your needle and cut a piece of thread, preferably in a matching color. The thinner the needle, the better the result!
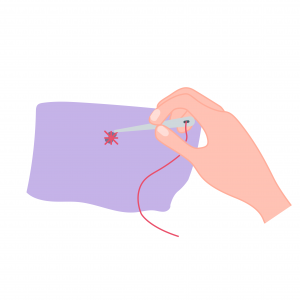
- Turn the garment inside out, use your fingers to pinch the fabric together and stitch a few millimeters from the edge of your hole, across the hole. Stitch in a ‘star pattern’.
- A few stitches will be enough to repair the hole. Too much stitching in one place can damage the fabric and will eventually create another hole where you’ve been stitching!

Patching a hole
Homemade Repair Patch
- This homemade repair is all about working with what you’ve already got, and showing some resourcefulness. It also requires some rudimentary sewing knowledge, but that’s a good skill to learn!
- In order to start working towards the satisfaction of repairing your own lycra garment, you’ll need to get a hold of some lycra fabric. Spare lycra is maybe not something that you will have readily available, however, if you’re smart about it, you can scavenge it from your existing garment (and a good reason to save any old apparel).
- Take your spare lycra, and cut it to be a few cm’s wider and longer than the rip or tear in your garment.
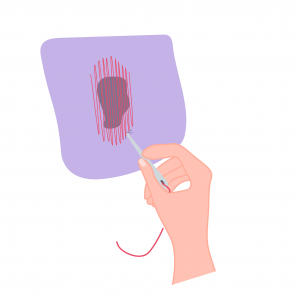
Now comes the challenging part: the sewing itself. Position the patch so that it’s behind the tear or hole in the garment. Next, using your sewing method of choice (by hand or sewing machine) and stitch a zig-zag pattern over the tear in your garment. - Bonus tip: Textile glue. If you have some textile glue, you can first glue the patch onto your garment before stitching. This will keep in place making it easier to stitch and reinforcing the hold. Make sure the glue is transparent and machine washable.

Iron-On Patches
If you’re looking for a solution that requires less time and effort, an iron-on repair kit might be a better solution.
Iron-on patches are easy to find online, just make sure they are:
- suitable for lycra, which means they will have a bit of stretch, especially important when you’re repairing bigger tears in shorts!
- are washable (at least until 40 degree. Celsius)
Here’s how to apply the iron-on patch to your garment:
- Lay the garment flat on a table or ironing board, and make sure the affected area is clean and dry.
- Set clothing iron to Temperature Low or Wool setting
- Gently press the warm iron on the affected area, ensuring that the damaged portion of the garment is as flat as possible. Better be safe than sorry: put a piece of cotton in between to prevent any kind of damage to your fabric from the iron!
- Now remove the back of the patch to reveal the adhesive side of the fabric.
- Press the patch firmly onto the tear or hole, and smooth it out with your hand, to make sure it is in the right position. Ideally, the patch should extend 5mm beyond the tear to the original fabric on all sides.
- Set the waxed paper from the patch or a piece of cotton fabric over the repair patch.
- Place the iron over the repair patch and gently apply heat using a circular motion for 60 seconds. Keep the iron moving to avoid damaging the garment.
- Allow 24 hours before washing the garment.


Tenacious Tape
A patch of Tenacious Tape is a quick repair fix that lasts and does not affect the warranty or our ability to make future repairs to your IRIS garments.
If you have a wide hole, you can use a rectangle, but be sure to round the edges. Rounding the edges prevents the corners from getting caught and peeling up. Watch this quick video on how to apply Tenacious Tape, it is particularly good for our Winter Jacket or Escape Padded Insulated Vest.